
This is a Sponsored post written by me on behalf of Astrobrights Papers by Neenah Paper. All opinions are 100% mine.
Make our quick and easy DIY back to school countdown slider! When I heard from AstroBrights papers about their back to school challenges, I was excited to create a back to school craft project for my son, who is about ready to start kindergarten in a few weeks. Astrobrights Paper is bright and bold and focused on inspiring the creativity that is lying dormant in us all! The vibrant colors are especially designed to prompt turning everyday ideas into art.
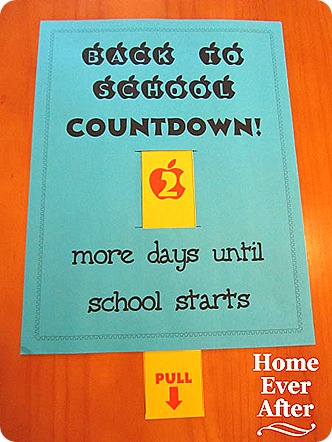
Making a DIY Back to School Countdown Slider
The countdown slider concept is really easy and can be adapted to many craft projects without a lot of prep work. For the back to school countdown slider, I started by printing out a mini poster that I typed up on the computer. However, you could easily use stencils, scrapbooking supplies, crayons, markers, etc. to create your sign.
The 2 important pieces to the countdown slider are the sign (background) and the slider (paper strip).
Supplies Needed: Astrobrights paper or other craft paper, scissors, razor blade (optional), and decorating supplies.
1. Start by making your sign. We chose to write out “Back to School Countdown” in a fun school inspired theme. Leave space in the middle of your page where you’ll draw 2 horizontal lines several inches apart (see below).

2. Next, create your slider by designing a strip of numbers on a separate piece of Astrobrights bold colored craft paper. We created red apples with the numbers 1-4 on the strip. Since our slider strip has a pull down arrow at the bottom, we made sure to make the numbers go from low to high, top to bottom, so that the countdown works properly.

3. Using scissors or a razor blade, score the two horizontal lines.

4. Cut out the slider strip so that it will fit the width of your scored lines on the sign.

5. Insert the slider strip from the front through to the back of the sign using both the top and bottom scores.

6. Finally, you’ll be left with your finished product: a working back to school countdown slider which your kids will love to use all by themselves! Try attaching it to the refrigerator with a magnetic clip so that they can reach it and see it often.
Get creative and see what back to school inspired projects you can make!
Disclaimer: This is a sponsored post written by Danelle Ice for Neenah Paper. IS World Media was compensated for creating this craft project and received free paper supplies to facilitate the project.

